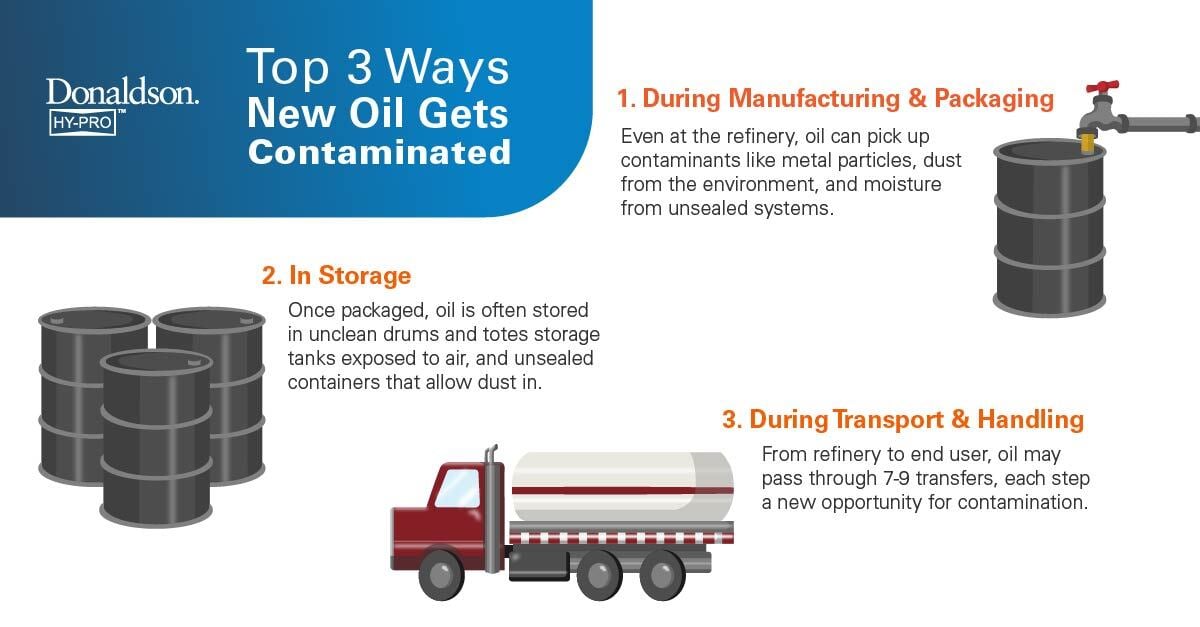


.png?width=750&height=288&name=Copy%20of%20Blog%20Podcast%20(10).png)
Do you know how to take a proper oil sample? Even small mistakes can make samples inaccurate. That’s why we’ve put together this step-by-step guide with a free checklist and video example.
Why Proper Oil Sampling Matters
Accurate oil sampling is the first step of effective fluid analysis. Without a representative sample, lab results can be misleading, and that means hidden contamination issues can go unnoticed. Problems like dirt, water, or varnish can then build up, shortening component life, raising maintenance costs, and even causing unplanned downtime.
By following a structured oil sampling procedure, you’ll get reliable data you can act on. That insight helps you maintain clean hydraulic systems, extend equipment life, and avoid costly surprises.
Step-by-Step Oil Sampling Procedure
1. Preparation- Identify the correct sampling point (valve, elbow, hose, or piping).
- Gather all materials: sample bottle with lid, waste bucket, sample hose, and gloves.
- Ensure continuous oil flow throughout the sampling process.
- Begin oil flow into a waste container to remove stagnant or contaminated fluid.
- Agitate the line by opening and closing the valve to loosen debris.
- Flush the sample valve, elbow or hose, and any upstream piping.
- Maintain oil flow until the final sample is collected and capped.
- Remove the cap while oil is still flowing, keeping it pointed downward to avoid airborne contamination.
- Never place the cap on surfaces, in your pocket, or in your mouth. Treat it as a contamination risk.
- Fill the bottle 1/3 to 1/2 full with flushing oil, cap it, and gently agitate.
- Discard the contents into a waste bucket carefully to avoid splash-back.
- Repeat 3–4 times until the bottle and cap are thoroughly flushed.
- Fill the bottle, leaving a small air pocket for lab agitation.
- Cap tightly and only then stop the oil flow.
Optional Validation Step
• Take a pre-flush sample in a separate bottle to compare lab results.
• This step confirms the effectiveness of proper sampling and provides trendable data for future maintenance.
Tips for Maintaining Oil Cleanliness
• Always wear gloves and handle bottles carefully.
• Label samples clearly with date, location, and system details.
• Store and transport samples in a sealed container away from heat or sunlight.
• Integrate sampling into a regular preventive maintenance schedule.
Accurate oil sampling helps protect your hydraulic systems, ensure clean oil, and extend machine life. Following proper procedures produces more reliable lab results and actionable insights to prevent costly downtime.
Watch the step-by-step procedure:
👉 Download our free Oil Sampling Checklist to help make every sample accurate and actionable.
About Donaldson Hy-Pro:
Donaldson Hy-Pro offers a wide range of hydraulic filtration solutions that can help you improve the performance of your machinery. Our filter elements are designed to combat dirt, water, and oxidation by-products, to help keep your systems running at peak performance.
If you're looking for a way to reduce filter expenses, improve oil cleanliness, and extend the life of your equipment, Donaldson Hy-Pro can help. Contact us today to learn more.